Running Deepseek AI Locally on a HPC Cluster
Deepseek-R1
By now almost everyone has heard of Deepseek’s R1 model, which took the world by storm. Its development was such a shock to analysts that the market value of NVIDIA fell by almost $593 billion. The model was relatively cheap to train and can run on much smaller infrastructure than necessary for competing models such as OpenAI’s O1 model (read more about O1 vs. R1).
In this post, we will explore how we can run R1 on a remote high-performance computing cluster and interact with python to perform, e.g., classification tasks. We will run the model on an HPC running Red Hat Enterprise Linux (RHEL) 8.7, with a 64-bit processor and multiple NVIDIA A100 GPUs, but other configurations are possible.
Ollama
We will be using the open-source package ollama to handle the backend for running Deepseek’s R1 model. Ollama provides a great interface for users to download and run LLMs such as Deepseek R1 and Meta’s LLAMA model, but also many more. The big advantage of ollama is its simplicity, it handles most of the complex set-up in the background without any need for us to do anything.
Installing ollama
The easiest way to install ollama is by direct download. On Linux, for example, simply run
curl -fsSL https://ollama.com/install.sh | sh
from the terminal to download and install ollama. Note, however, that this might require you to have admin access to the server, which on many public HPCs you might not have. Therefore, we can use a different (unfortunately still not well-documented) way to install ollama).
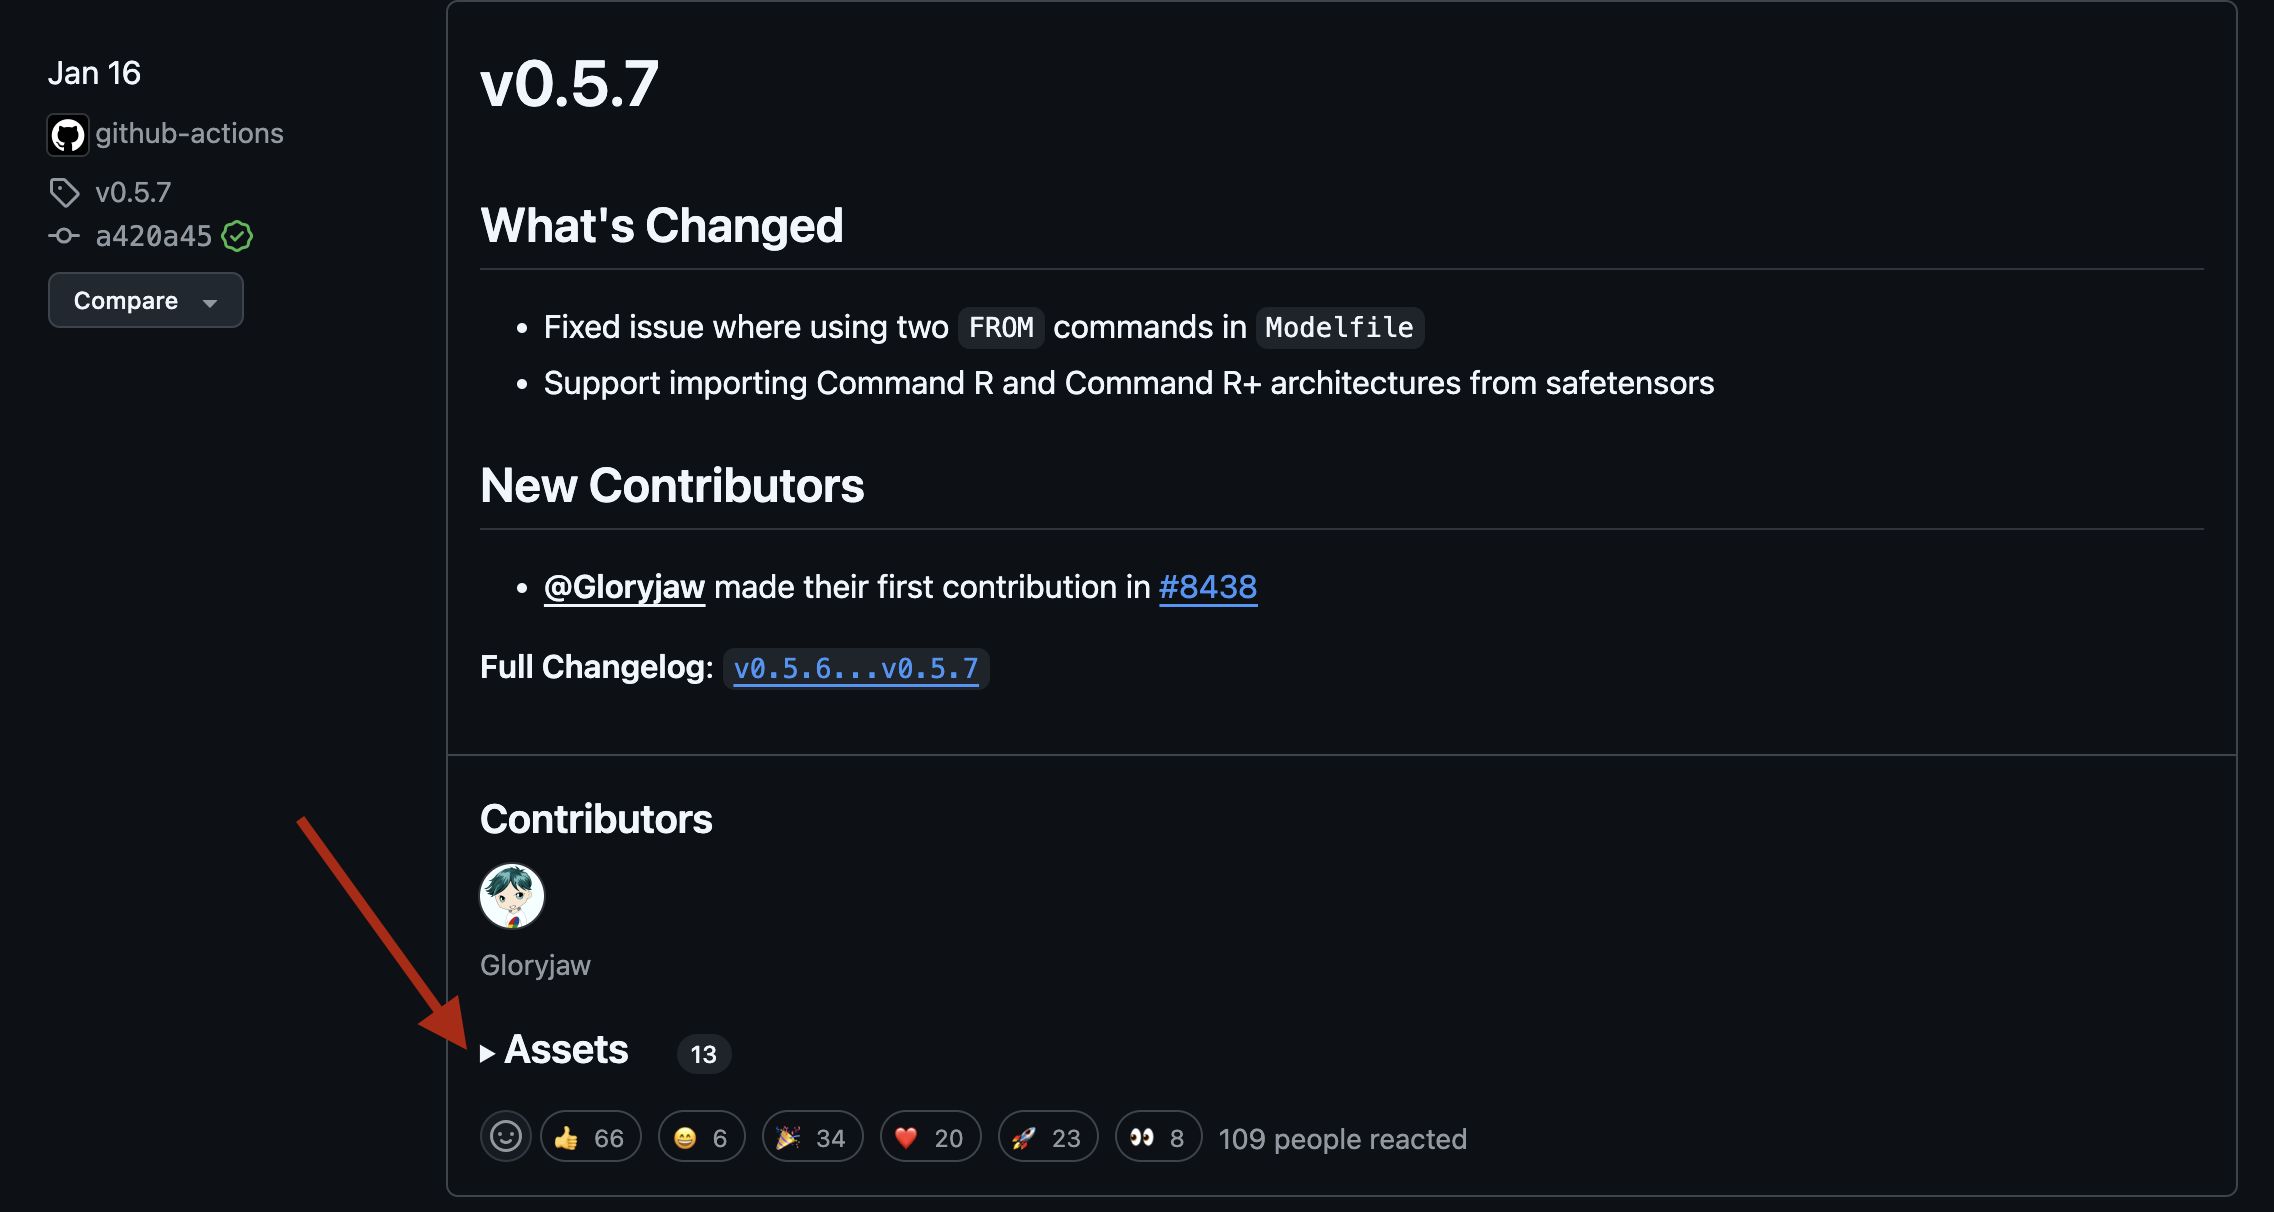
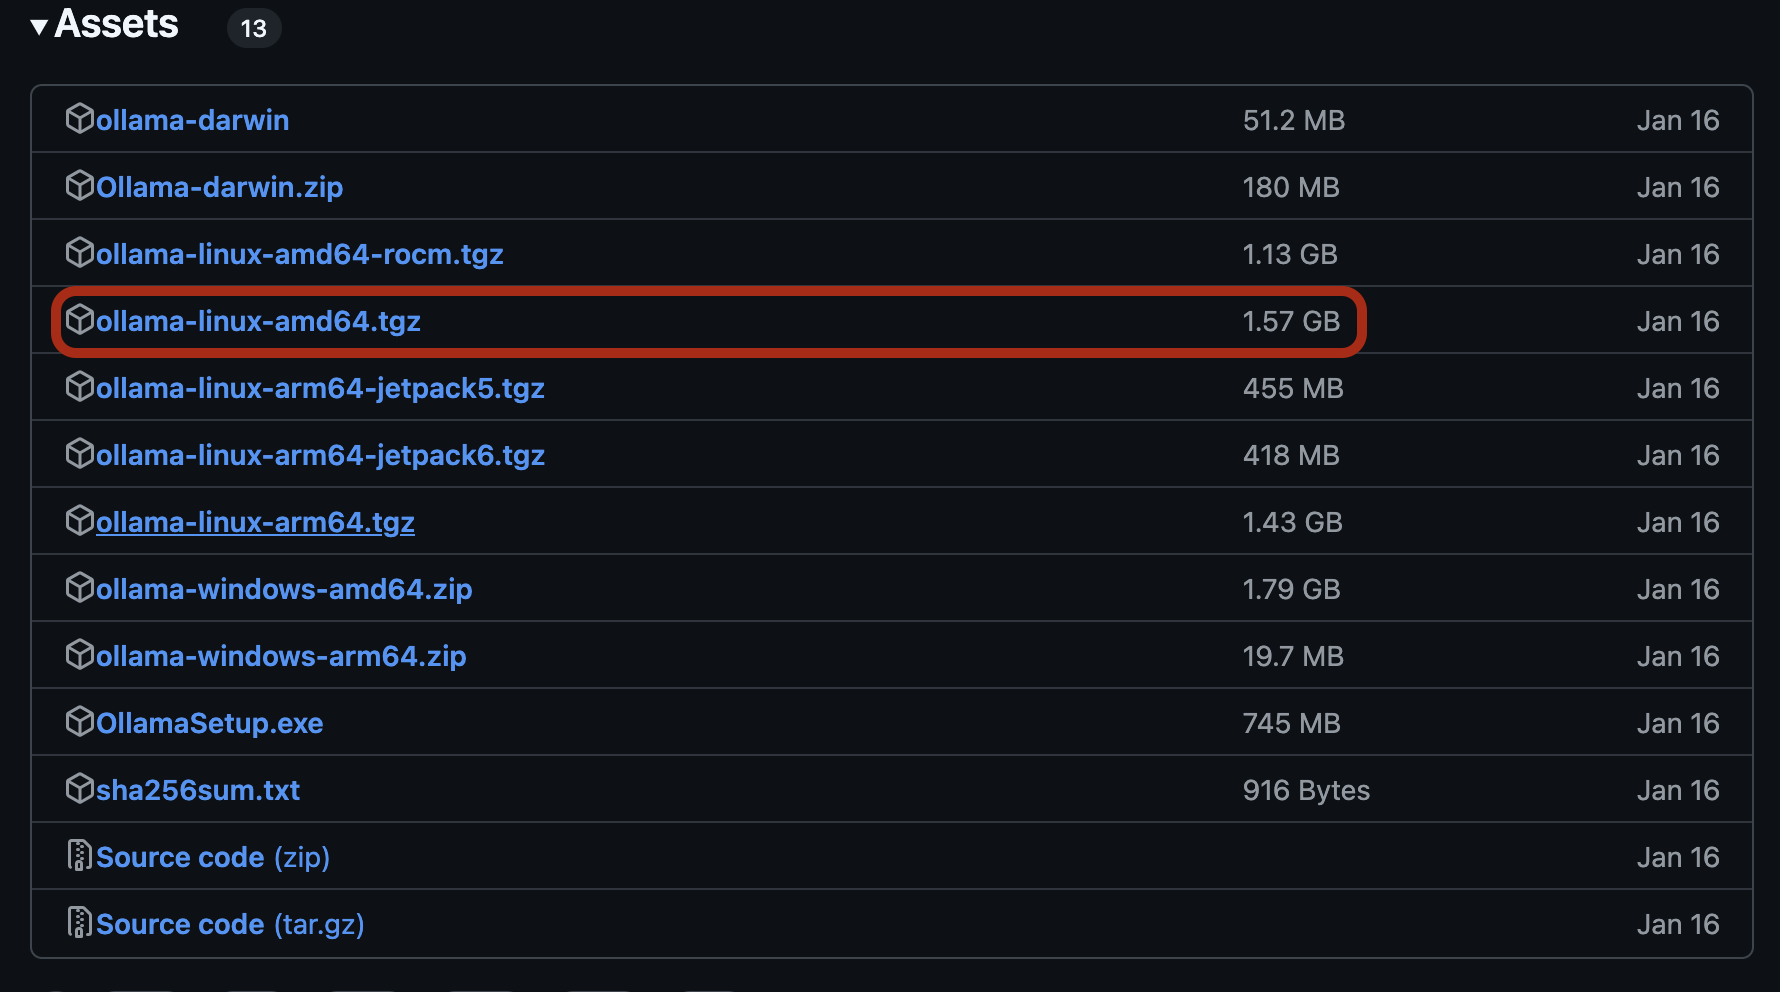
We will download a pre-compiled binary of ollama. You can find the newest releases of ollama on github. Under the releases, click on assets and download the correct pre-built binary for your system (see also pictures below).

In my case, with a 64-bit Linux version with NVIDIA GPUs, I need the ollama-linux-amd64.tgz version. Download the binary directly on your HPC, e.g., with wget:
wget https://github.com/ollama/ollama/releases/download/v0.5.7/ollama-linux-amd64.tgz
On many HPCs, you will have limited storage in your home folder, so it may be a good idea to think about where you want to place ollama.

Once downloaded, let’s unpack ollama:
tar -xzf ollama-linux-amd64.tgz
After the package is unpacked, you will need to locate the binary. This has different locations in different ollama releases, but generally you should look in the new folder for some path like ollama/bin/ollama. Make the binary executable:
chmod -x ollama/bin/ollama
At this point you can test if the executable is correctly installed by simply checking its version:
ollama/bin/ollama --version

------------------------
Warning: could not connect to a running Ollama instance
Warning: client version is 0.5.7
------------------------
Don’t worry about the warning; this is because we are currently not running ollama.
Before starting ollama let’s do one final step, adding it to our PATH so that we can easily run ollama by just calling ollama.
export PATH="$HOME/ollama/bin:$PATH"
Remember to replace $HOME/ollama/bin with the location of the bin folder in your ollama binary. Personally, I have also added this line to my ~/.bashrc file so that ollama is always available even after I start a new window with bash.
Test that everything worked out by checking the ollama version again: ollama --version.
Running a model in ollama
We are now ready to run a model in ollama. First, ollama requires a service to run as a background task, which you can start with: ollama serve&. If you are not automatically sent back to the console after starting the service, you can simply exit with CMD+C. Check that the service is running with ollama --version. Now you shouldn’t get a warning anymore but information about the background service.
A sidenote on ollama serve
A quick note on ollama serve&: Since this is a background task, be a good HPC user and do not run this on the login node, or if you absolutely have to, make sure you stop it before you disconnect from the HPC or when you are not using it anymore. Ollama doesnt have a built in way to stop the task, but you can simply kill it:
ps aux | grep ollama

Locate the correct task number relating to ollama serve and kill it:
kill 875048
Run the first model
To download your first model, you can run
ollama pull huihui_ai/deepseek-r1-abliterated:8b
(this is an uncencored small version of Deepseek R1, feel free to download a bigger one if you have enough storage space and GPUs).
If you are not already using a node with GPUs, you will now want to switch to one. Once on this node, you might need to start the ollama service again (ollama serve&).
Now we can finally start the model:
ollama run huihui_ai/deepseek-r1-abliterated:8b
This should start your downloaded model and open a chat in the command line that allows you to communicate with the model. To stop the chat, use /bye.
Note that this does not free up the memory used by the model because it is still running in the background. Ollama will shut the model down automatically after 5 minutes, or you can stop it with
ollama stop huihui_ai/deepseek-r1-abliterated:8b
Using python to interact with our model
Most likely you don’t just want to run the model and chat with it like you would with ChatGPT, but you might want to run the model and interact with python, e.g. to peform some classification on many texts. Thankfully, ollama provides a neat python package to do just that:
pip install ollama
Once installed, we can use python to interact with our Deepseek LLM. Make sure your ollama background task is running (ollama serve&). Now we can interact with a model like so (here we are asking for a list of the US presidents between 1900 and 2020):
from ollama import chat

model_name = "huihui_ai/deepseek-r1-abliterated:8b"
message = [{
        'role': 'user',
        'content': "List all the U.S. presidents between 1900 and 2020.",
    }]

response = chat(model=model_name, messages=message)
print(response.message.content)
This is pretty simply and for those who have already used e.g. the ChatGPT API in python it will feel familiar, but ollama can do more. We might actually like to have the presidents as a list of JSONs, each containing the name and the date of birth of the presidents. We can easily do this in combination with pydantic:
import json
from pydantic import BaseModel
from ollama import chat

class President(BaseModel):
    name: str
    birthyear: int

class PresidentsList(BaseModel):
  presidents: list[President]

model_name = "huihui_ai/deepseek-r1-abliterated:8b"
message = [{
        'role': 'user',
        'content': "List all the U.S. presidents between 1900 and 2020. Respond with their name and year of birth in json format.",
    }]
response = chat(model=model_name, messages=message,
                        keep_alive="-1m",
                        format=PresidentsList.model_json_schema(),
                        options={'temperature': 0})
print(response.message.content)
We have added a few parameters to our chat function:
-
keep_alive="-1"tells ollama to keep the model running until we shut it down explicitly, a useful thing if you want to run multiple queries. -
format=PresidentsList.model_json_schema()provides ollama the JSON schema of how we want responses of our LLM to look. - Finally, in options, we specify a temperature of 0, which makes the model deterministic to allow for reproducibility.
The response should then look something like this:
{ "presidents": [
    {"name": "William McKinley", "birthyear": 1843},
    {"name": "Theodore Roosevelt", "birthyear": 1858},
    {"name": "William Howard Taft", "birthyear": 1857},
    {"name": "Woodrow Wilson", "birthyear": 1856},
    {"name": "Warren G. Harding", "birthyear": 1865},
    {"name": "Calvin Coolidge", "birthyear": 1872},
    {"name": "Herbert Hoover", "birthyear": 1874},
    {"name": "Franklin D. Roosevelt", "birthyear": 1882},
    {"name": "Harry S. Truman", "birthyear": 1884},
    {"name": "Dwight D. Eisenhower", "birthyear": 1890},
    {"name": "John F. Kennedy", "birthyear": 1917},
    {"name": "Lyndon B. Johnson", "birthyear": 1908},
    {"name": "Richard Nixon", "birthyear": 1913},
    {"name": "Gerald R. Ford", "birthyear": 1913},
    {"name": "Jimmy Carter", "birthyear": 1924},
    {"name": "Ronald Reagan", "birthyear": 1911},
    {"name": "George H.W. Bush", "birthyear": 1924},
    {"name": "Bill Clinton", "birthyear": 1946},
    {"name": "George W. Bush", "birthyear": 1946},
    {"name": "Barack Obama", "birthyear": 1961}
] }
Closing thoughts
As you see, it’s actually quite simple to run an LLM on your HPC with ollama. Also, interacting with it in python is quite straightforward, and the API offers many nice features. One issue that I found with ollama however, is that it caches models in ~/.ollama, meaning in your home folder, on many HPCs, your space in these folders might be limited. A possible workaround is described in this issue and makes use of a symbolic link to trick ollama into putting the files in a different location.